Microsoft Copilot’s New Feature “Edit in Pages”
Microsoft has recently released several new features for its GenAI Copilot Chatbot. This blog post focuses on the new Edit Page feature and associated functionality. The Edit Page feature allows users to turn AI-generated content into editable, shareable, and reusable assets:
User will now be able to:
- Create a page: Click Edit in Pages at the bottom of a Copilot response to create a page with the response already copied and formatted.
- Edit and refine: Continue the conversation in chat while editing the page. More content can be added to the page by clicking Edit in Pages.
- Share and collaborate: Share the page with others so they can collaborate with you. This is achieved through Microsoft Loop.
- Copy component: Click the share icon in the upper right and select “Copy component” to surface the page in a fully interactive way when you paste it into MS Teams or Outlook.
The new Microsoft Copilot ‘Pages’ offers a dynamic and persistent canvas that is designed for multi-user AI collaboration allowing users to blend human and AI interactions into a seamless workflow.
*NOTE Please note that Microsoft is rolling this feature out in phases. Most staff at Teesside University should already have access to this functionality; however, if you don’t see it in your Copilot environment yet, rest assured that it will become available soon!
For more information watch the brief video and/or review the written instructions supported with screenshots below.
Working Example: Asking Copilot to develop a workshop outline
Having produced, inputted and executed a prompt in Microsoft Copilot, the final output might look like this. You will notice that there is now an ‘Edit in Page’ button at the bottom of the page.
Clicking on this button will open the prompt output in a new page on the right side of the screen allowing you to edit, refine and share the content as if in an actual office document.
You can now ‘edit in real time‘ the prompt output by adding, removing and modifying the text, including applying formatting.
Depending on the prompt output, additional configuration options are available. These include the following:
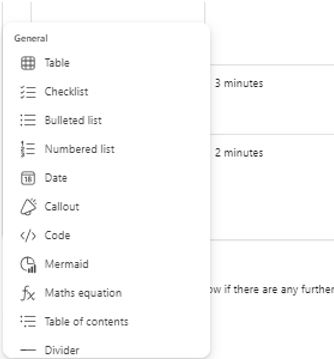
Click to insert below: This option allows you to add additional content below the original prompt output content. Including items such as Tables, Checklists, Date, Code, Maths equations, Divider etc.
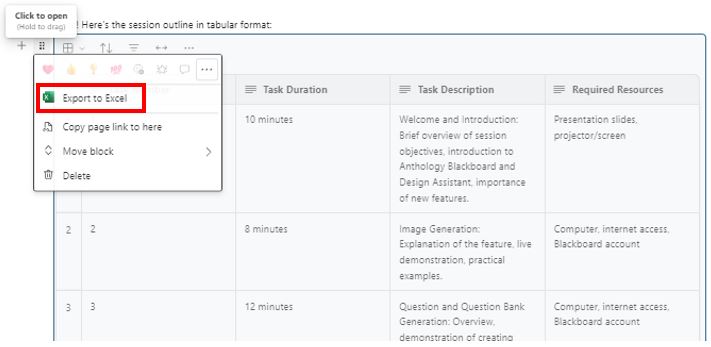
Click to open: This feature allows the opening of a prompt output in the most suitable Microsoft Office application. For example, if the prompt output is text it will offer to open in Word and if the prompt output is a table, it will open in Excel.
Choosing this option will select the content of the output and perform additional functions including:
Export the prompt output currently in the page view into the associated Office document.
Once the export is complete, the output will open in the associated office document.
Copy the page link to share with other members of the organisation as a loop page.
Move the Block up or down (only if you have multiple prompt outputs on the page) or Delete the prompt output.
Switch View: Allows the view of the prompt output in Pages to be viewed differently, this is dependent upon the prompt output type and the configuration of the content that has been outputted.
Sort: Depending on the prompt output allows the content that has been generated to be sorted.
Filter: Depending on the prompt output, this allowed the generated content to be filtered based on several variables.
Expand View: Depending on the content that the prompt output has generated (for example a table), you can expand the view of the output to fit the screen width of the edit page feature.
More options: The more options feature provides additional functionality (depending on the content that the prompt output has generated). For example, for the generated table; Row height, Hide column, Rules and Export to Excel.
For more information on what Microsoft Loop is and how to use it please see the following guide, Microsoft Loop – E-learning Help Guides.
For further support and guidance, please contact the Digital Learning team.


It seems that the embedded video that should be present in this blog post has been removed during the publishing process. To view the missing video please visit the following address https://tinyurl.com/5dyz4a8z