
Introduction
 Blackboard comes with its own calendar facility which allows you to enter different events to keep your module on track. However, you may be wanting something with a bit more functionality – like the ability to categorise events. If so, you might want to think about using the calendar plug-in that comes with WordPress. As part of your WordPress blog site you can incorporate an interactive, customisable calendar that has some very nice features which we’ll discuss in this article.
Features
Reasons for using the calendar in a WordPress site might include:
- You can have multiple categories in your calendar – such as Year 1, Year 2 or Lecture, Workshop and so on. Individuals can then decide which categories they want to view.
- Categories can be colour coded and even assigned images, allowing for quick visual identity.
- Students can be assigned a special role which allows them to modify the calendar without being able to modify the rest of the blog.
- Events can be set up with detailed information such as dates, times, locations and even maps. Events can also be set to repeat over different time intervals for common events.
- If so desired, Events can be set up so as to allow commenting to promote discussion.
- The calendar can be exported into a variety of different mediums – including Outlook. This then automatically updates itself so you can keep track of events using your preferred device.
- Ability to customise the look and feel of the calendar.
When tested across different browsers the calendar functioned well using Internet Explorer, Chrome, Firefox and Safari. However, earlier versions of Internet Explorer (in this testing version 9) produced limited results. When tested on different devices, it responded very well with both tablets and smart phones.
Quick Guide
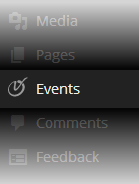 Before you go any further, the first thing you’ll need to do is make sure the Time.ly calendar plug-in is active – you can quickly tell by looking for a menu item called Events in your Dashboard. If you can’t see Events, then please get in touch with the e-learning team who will be only too happy to enable the plug-in. Clicking on Events will give you access to the various settings and options.
To create your calender, open the Events menu from your Dashboard. Select Settings and under Viewing Events select where you want the calendar to appear from the Calendar Page drop down list as shown below.
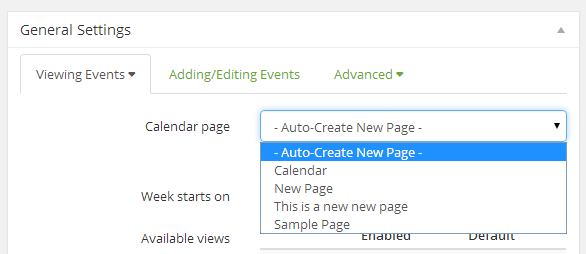
Auto-Create New Page will create a new page called Calendar in your blog, even if there’s a page called Calendar. If you want your own specific named page, create the page first and then select that page from the drop down menu.
If you like, browse through the various options but you can always come back to these settings at a later date. These settings allow you to change things like whether the calendar is going to display monthly or weekly. It might be a good idea to use the default settings to begin with. You can then tweak the settings at a later date when you’ve experienced how it works and what you like/want from the calendar.
Down at the bottom of the page click Save Settings.
That’s pretty much it for getting a calendar into your blog. When you view your blog there’ll be a new page called Calendar (or where you have specified the location). This is where the calendar is.
We’ll now look briefly at some of the settings below to get you up and running. This is not an exhaustive list but hopefully it covers the essentials of using your calendar.
Adding Events
Adding events to the calendar can be done through either All Events or Add New from the Events menu. Give your event a title and then you can fill in the details including as much or as little data as appropriate. Over on the right hand side you can assign the event a category. If you have not created any categories, there’s a handy “Add New Category” link so you can create it there and then. Categories can be customised under the Event Categories option (covered later).Scroll down the page to see all the available options that you want to use and then click on Publish when you are happy.
Adding Categories
As mentioned above, you can create categories as you are creating events. However, you might want to include more information or change a few settings like adding colours to categories. You can add images as well so when students hover over a particular event that’s categorised, an image appears. Certainly not essential, but a nice touch.
If you have created and used different Categories, your calendar will display the option to filter the calendar on different categories depending on your preference. Simply select the appropriate category from the drop down menu in your calender. You can also select multiple categories to fine tune your calendar view.
Appearance
Changing the look of your calender can be done quickly by going to Calendar Themes and choosing one of the pre-set options. If one takes your fancy, click Activate under the theme to apply it.
You can make more changes to the calendar appearance under Theme Options. From here, you can change things like the colour of the text, colour of lines, shadows and many more.
Adding Your Calender to Outlook
As many of us use Outlook in the University, it could be useful to synchronise your WordPress calendar with your Outlook calendar. The first thing to do is make sure the Subscribe option has not been hidden. You can find this under Settings – ensure the “Hide Subscribe/Add to Calendar” option has not been checked.
![]() When you look at the calender in WordPress site (not through the dashboard), there will be a Subscribe button near the bottom of the page (as shown to the left). Clicking on this displays a small menu. Select Add to Outlook from the list of options. Depending on your browser, you will probably get some message asking if it’s okay to allow the website to open a program on your computer (that is, Outlook). If you say Allow it will go ahead and create a new calendar in your Outlook Calender. This will now be automatically updated and so allow you to keep track of different events that are publicised in your WordPress calender.
When you look at the calender in WordPress site (not through the dashboard), there will be a Subscribe button near the bottom of the page (as shown to the left). Clicking on this displays a small menu. Select Add to Outlook from the list of options. Depending on your browser, you will probably get some message asking if it’s okay to allow the website to open a program on your computer (that is, Outlook). If you say Allow it will go ahead and create a new calendar in your Outlook Calender. This will now be automatically updated and so allow you to keep track of different events that are publicised in your WordPress calender.