
In this post we’re going to look at one way in which you can embed your Microsoft Word document into Blackboard. By embed we’re talking about not just attaching a link to the Word document. We’re talking about a way in which students can access the document itself instantly within Blackboard – no need to save the document and open it up, just the ability to read it directly in the module. It’s worth pointing out that there are many ways to achieve this.
What we’re going to discuss here is a way of doing this using online conversion tools that require no sign up, and no installations on your computer.
The key to this process is converting our Microsoft Word document into a HTML5 document. HTML5 is a relatively new internet-ready document or website that works across a wide variety of platforms and devices. It’s often cited as the “next big thing” with regards to displaying content across the Internet.
The process is divided into two parts: converting your document and then embedding your document. The first part of this approach assumes you have little to no experience with technology. The second part will require a minimal amount of “coding” but it’s hoped that this guide explains it very clearly for you.
Step One – Converting your Microsoft Word document
By using a free web service called Zamzar we can convert our document quickly and easily.
There are two ways to do this. You can go to Zamzar and directly convert your Word document to HTML5. Alternatively, you can add an extra step and convert your Word document to PDF and then convert the PDF to HTML5 (all through Zamzar).
Why bother with the extra step? Well, for some reason, if you convert your document to a PDF first and if your document uses headings and sub headings, the conversion process from PDF to HTML5 creates a nice content menu made up of headings and subheadings, giving the finished product an easy to navigate approach. This could be useful for larger documents and might be worth considering. So how do we do this?
- Go to www.zamzar.com and you’ll see something like this:
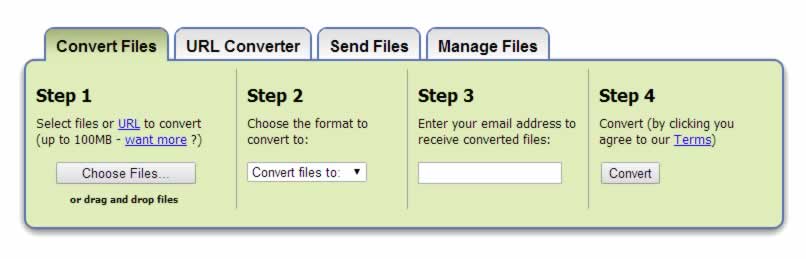
- Under Step 1 click on the Choose Files button and locate your Word document to convert. Your document will appear in a list labelled Files to Convert
- Under Step 2, use the drop down list to select the file type to convert to. You can go directly to HTML5 or you could convert to PDF first (as outlined above)
- Type in your email address in Step 3. If you’re concerned about getting spam after submitting your email I’ve been testing this approach for a few weeks now and can safely say that (so far) I’ve received no junk messages or spam emails.
- Click on Convert under Step 4
- After a short space of time you’ll get an email saying your file is ready to download. Open up the email. Amongst other things, you will see a message like this:
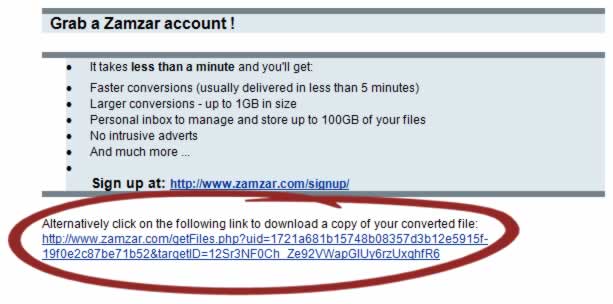
- Click once on the long complicated looking link circled above. This will then take you to the download page.
- From the download page, you’ll see something like this:
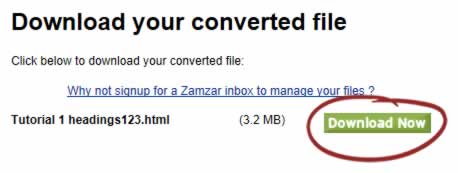
- Click on the Download Now button (circled above) and your converted file will now download.
Step Two – Embedding the Document in Blackboard
Now that you’ve got your HTML5 file from the above step, you’re set to embed this into Blackboard.
One of the great things about using Zamzar is that it produces a single file which contains everything Blackboard needs. We’re going to embed this file into our module using something called an iFrame. If you’ve never heard of this before, it’s a method we can use to put a web page inside another web page. So in this case, we’re putting our HTML5 document/web page inside a Blackboard web page.
We’re going to use a small program called Notepad. This is a free application that comes with all computers. We use Notepad for the process as we only want to create basic text. You could use Microsoft Word but there’s no guarantee the following steps will work. Microsoft Word can put in a lot of extra characters “behind the scenes”. For Mac users, you might want to look at a program like TextEdit. If you’ve never used Notepad before, simply click on the Start icon on your computer and locate Notepad. If you don’t see Notepad listed, type it into the box labelled Search programs and files.
Now that we’ve outlined the process, lets look at the steps in detail.
- Firstly we need to upload our file that we created into the Course Files area of your module. If you log into Blackboard and go into your module, you should see the Control Panel on the bottom left hand side of the page. Click once where it says Files (directly under the title Control Panel) and click once again on the module code that will now be displayed.
- If you’ve never been here before, this is the space in your module where all your files reside. At the top of the page, hover your mouse over the button labelled Upload and select Upload Files from the little drop down menu.
- Click on Choose File and locate the HTML5 file you created previously.
- Click on Submit and the file will be uploaded into your module
- Now comes the first tricky bit. We need to locate the file we’ve just uploaded and get a copy of its address – its URL. There’s a good chance that you will be able to see your uploaded file in the list in front of you. If you can’t see it, click on Edited to sort the file list into date order. Click on Edited again to show the most recent items at the top of the list. Now you should be able to see your file. Right click your mouse on the file name and select either Copy Link Address or Copy Shortcut.
- Open up Notepad on your computer. Inside Notepad, right click again and select Paste. You should get a line of code that looks something that looks something like the following. It won’t be the same, but this should give you an idea of what you’ll get.
https://eat.tees.ac.uk/bbcswebdav/courses/DLD1069-N-BJ1-2014/MyHTML5.html
This is the address of where the document is stored inside your Blackboard module. Keep Notepad open as we will need this line of code in a minute.
- Select the following bit of code using your mouse and copy it into Notepad (preferably below where you have saved the file address):
<p>http://abcd</p>
- In the code above, replace the text abcd with the address code you copied in step 6. Make sure you leave the quotation marks surrounding it. Again, keep Notepad open as we’re going to come back to all of this in a few steps. So, using steps 6 and 7 as examples, your code would look like this:
<p>https://eat.tees.ac.uk/bbcswebdav/courses/DLD1069-N-BJ1-2014/MyHTML5.html</p>
- Now go to the area in your module where you would like to embed your document. Hover your mouse over Build Content and select Create Item
- Give it a suitable title. Now click on the button that says HTML
- A pop up window will appear called HTML code view. In this box that appears, copy the code you created in step 8. That is, copy the code from (and including) <p> all the way to </p>.
- Click on Update (bottom right of the HTML box).
- Click on Submit
- Your content should now be embedded!
Once you’ve got the HTML5 file embedded you can edit the code to adjust the display a little bit. If you look at the code there are two parameters: width and height. We set the width to 100% so it scales across different sizes of monitors. However, the height is set to 800 which restricts how much is displayed at any one time. You could try adjusting the height to vary the display. Feel free to contact the eLearning team if you require help or would like to chat about this process in more detail – we’re only too happy to help!