The idea for the piece…
I’ve had this idea for a while and every time a holiday season comes around, I promise myself that I will write the pattern 😀. Holiday wreaths were traditionally placed as Christmas decorations (having lots of symbolism in the Christian faith) but in recent years have become a main staple house decoration for all seasons and celebrations. Autumn wreaths are very popular in the UK when the beautiful colours of the season arrive and there is plenty of dropped foliage to forage and store.
Within a cell, a plasmid is a piece of DNA that exists in addition to the chromosome and can replicate independently. In older publications plasmids are typically described as small, double stranded circular DNA molecules. More recent publications will allude to other structural confirmations that exist. Nevertheless, the typical image that most science students encounter will be a circular plasmid, drawn in black and white, and labelled with tiny italicised scientific notations. Some links to further reading about plasmids can be found at the bottom of this post.
Some background info…
So both of these worlds need to be joined by the medium of crochet. This pattern will describe how to crochet and construct a plasmid wreath. I have chosen to make the plasmid pUC19 (p = plasmid; UC = University of California where it was created) as it is one of the most well know and commonly used plasmids. And it is one that we would typically use in undergrad teaching and labs. The first stage of the process required me to do some reading around the plasmid itself – its size and which genes it carries. The basic elements of pUC19, and the regions that I wanted to include in the pattern, are as follows:
| Region | Approximate Size (nucleotide base pairs) |
| Whole Plasmid Size | 2686 |
| LacZ | 400 |
| Multiple Cloning Site | 60 |
| Lac operator | 20 |
| Lac promoter | 30 |
| Origin of replication | 600 |
| AmpR | 900 |
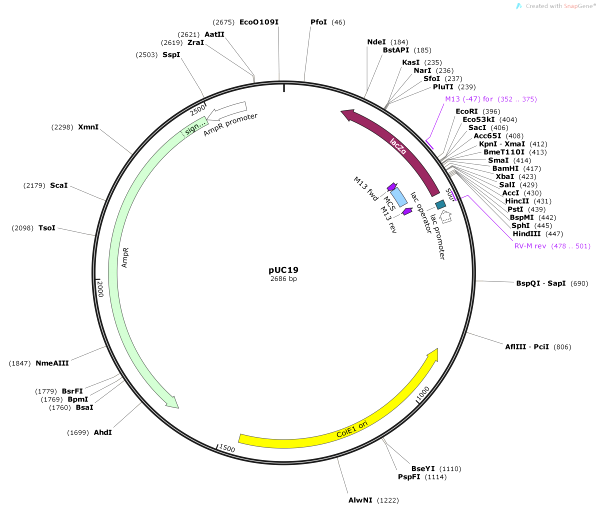
Here’s an image of pUC19, courtesy of snapgene pUC19 Details at Snapgene.com
Pattern notes…
For this project, the crochet is a rectangle piece worked flat in single crochet using multiple colours of yarn to give the striped effect. This piece is then wrapped around a wreath and stitched together. I used a polystyrene wreath for this project, but other styles are available (and just using stuffing will suffice). Wreaths can be purchased from many crafting outlets (NB Hobbycraft UK have stopped selling them to reduce their plastic usage).
Measuring up…
In order to ensure your crochet piece fits around your wreath without being too baggy, you will need to measure the dimensions prior to starting as follows:
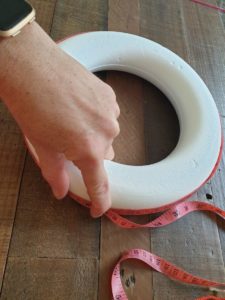
1. Length of your crochet piece (how many rows you should crochet): first, measure the inner and outer circumference of the wreath. Work out the average of these two pieces and then add on a few centimetres. For my wreath the measurements were:
-
- Outer 78 cm
- Inner 46 cm
- Average 62 cm
- Crochet piece to be made to approx. 65 cm
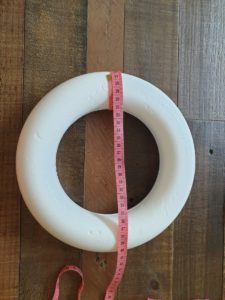
2. Width of your crochet piece (how many stitches wide your piece needs to be): measure the circumference of the wreath body and using your yarn, crochet a number of chains and test out their fit around the wreath. Take into account your yarn type – how stretchy it is etc. My measurements were:
-
- Circumference 17 cm
- Chosen width 25 chains (which was approx. 14 cm without stretch)
So I was crocheting a piece that was 24 stitches wide (plus one turning chain) and 65 cm long. In order to ensure the sizes of the genes were representative, I did some calculations to determine how many centimetres I would crochet for each section of the plasmid. The size of the plasmid is 2868 base pairs to be crocheted over 65 cm piece, so this meant I was crocheting approx. 45 base pairs per cm. Using the table from earlier, I came up with an approximate plasmid wreath map as follows:
| Region | Approximate Size (nucleotide base pairs) | Length of crochet piece (see later section for details) | Colour Yarn | Number of rows at 2 rows per cm (see section on Gauge for details) |
| Whole Plasmid Size | 2686 | 65 cm | 130 | |
| Plasmid Backbone | approximated here | 4 cm | Cream | 8 |
| LacZ Gene | 400 (split before and after MCS) | 6 cm | Burnt Orange | 12 |
| Multiple Cloning Site | 60 | 1 cm | Variegated Yarn | 2 |
| LacZ Gene | 400 (split before and after MCS) | 2 cm | Burnt Orange | 4 |
| Plasmid Backbone | approximated here | 1 cm | Cream | 2 |
| Lac Operator | 20 | 1 cm | Yellow | 2 |
| Plasmid Backbone | approximated here | 1 cm | Cream | 2 |
| Lac Promoter | 30 | 1 cm | Brown | 2 |
| Plasmid Backbone | approximated here | 10 cm | Cream | 20 |
| Origin of Replication | 600 | 13 cm | Orange | 26 |
| Plasmid Backbone | approximated here | 4 cm | Cream | 8 |
| AmpR | 900 | 21 cm | Maroon Red | 42 |
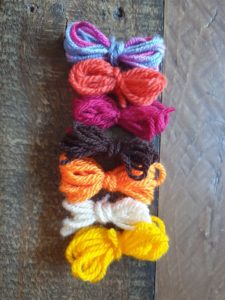
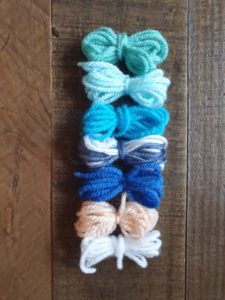
I chose autumnal colours for the piece, so here in the UK right now this would be represented by the changing colours of the leaves and foliage from green to browns, reds, oranges and yellows. I used yarn from my stash for this project, where possible choosing what I guessed was double knit weight yarn (seen below, top to bottom these are the colours for MCS, LacZ, AmpR, Lac promoter, Ori, Plasmid Backbone, Lac operator):
Working out Gauge…
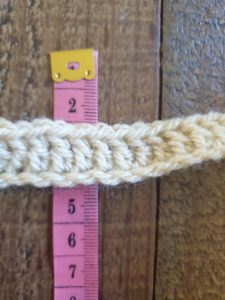
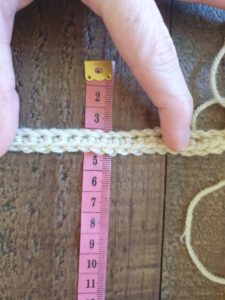
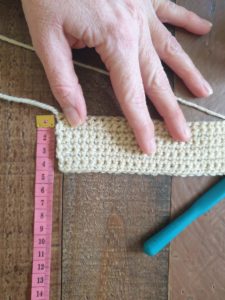
This is where you work out how many stitches you will need to achieve the correct width and length of your piece. I used a 4 mm hook, with double knit weight yarn. I did a couple of tests (see pictures below) to determine how many rows and stitches I would crochet per cm using my chosen materials.
Earlier I showed how I calculated the width of the piece as being 24 stitches across (with one turning chain at each end – not counted as a stitch) which equalled 14 cm. I crocheted two test pieces, each 24 stitches and one row of crochet, one in single crochet and one in double crochet (these are the US terminologies). The results are shown below. One row of double crochet was 2 cm in height, which I felt was too tall and wouldn’t give me enough definition and density of material. Hence I chose to use single crochet stitches – approx. 2 rows per centimetre of material.
Materials…
4 mm crochet hook
Double knit yarn in seven colours
Yarn needle
Wreath (or toy stuffing)
Tape measure
(You can use any hook size or weight of yarn but will need to take this into account when measuring gauge).
Pattern…
This is a nice, easy crochet pattern that beginners can follow, and I’ve included lots of pictures to help with construction. I hope you enjoy it.
If you create a piece – please tag me in on Twitter (@SciKnit) or Instagram (@ilovescienceknittingme) and use the #PlasmidWreath
- Using cream yarn chain 25.
- Single crochet into second chain from the hook.
- Single crochet into each chain to the end of the row (24 stitches total). At the end of the row, chain one (this is your turning chain).
- Turn. One single crochet into each single crochet across the row (24 stitches in total). Chain one.
- Repeat step 4 another 6 times (total 8 rows cream)
- Step 4 is one row of crochet. Repeat this step for each of the different colour yarns in the following order and for the suggested number of rows:
- Burnt orange (12 rows)
- Variegated colour (2 rows)
- Burnt orange (4 rows)
- Cream (2 rows)
- Yellow (2 rows)
- Cream (2 rows)
- Brown (2 rows)
- Cream (20 rows)
- Orange (26 rows)
- Cream (8 rows)
- Maroon red (42 rows)
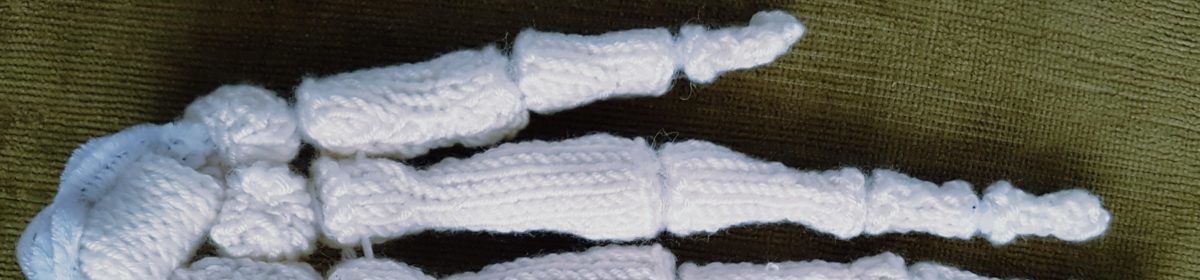
- Measure length as you go along to ensure you are meeting the gauge requirements. When finished, you should have a long piece of striped crochet as below:
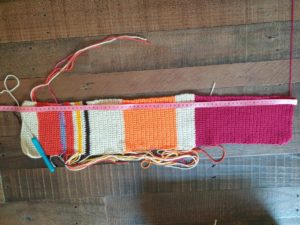
- Finished crochet piece
Constructing the Wreath…
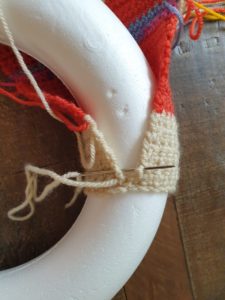
Here, you will need to sew your finished piece around your wreath. Some guidance and pictures below:
I left long yarn ends for each colour and used these to sew up the edges of each piece using mattress stitch and a yarn needle. Once I reached the end of a colour section, I tied the working yarn to the loose end piece of the same colour and left these to tidy up at the end.
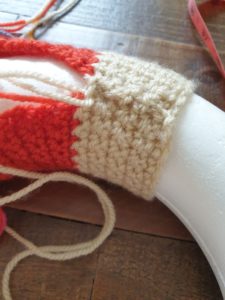
Once I had sewed around the edges and sewed each end together I had the loose ends of yarn to tidy up. I used a yarn needle to tuck these into the inside of the piece and cut the loose ends as below:
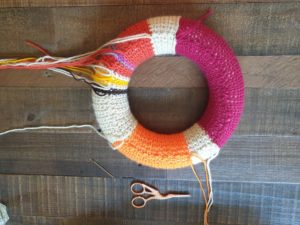

I then sewed a little piece of yarn onto the top to allow the wreath to hang from a picture hook.

And finally…
Its finished!!! What do you think? Essential décor for every lab wall 😍!

As I said earlier, please send me pics or tag me into posts of you use the pattern. I would LOVE to see some creations of this piece. I have a winter frost plasmid wreath planned already – colour palette below:
Even better – can you design your own pattern for your favourite plasmid?
Thanks for reading,
Helen x
@SciKnit